You start populating the Planning Board by selecting a planning folder for each swim
lane.
The drop-down list for each swim lane displays the hierarchy of active planning
folders for all the sprints and scrum teams that are under the project's root planning
folder. By default, inactive planning folders are not shown in the swim lane drop-down
list. You can organize the Planning Board the way you want by populating the swim lanes
with planning folders of interest to you: for example, you may select the planning
folder corresponding to the product backlog in the leftmost swim lane and various teams
working on the release in the other two swim lanes, or a different sprint in each swim
lane. Your selections are remembered for the current
session.
In
the Planning Board, artifact cards are displayed in ranked sequence within each swim
lane. The tasks that you can accomplish while you work with the Planning Board
include:
- Adding artifacts (quick add) in select planning folders with minimum
required artifact information.
- Editing artifacts.
- Moving artifact cards within a swim lane and ranking them in select planning
folders.
- Reassigning (move) artifacts from one planning folder to the other.
-
Click TRACKERS in the project navigation bar.
-
In the List Trackers,
Planning
Folders
and Teams page, click
PLAN.
A Planning Board for the current project context is displayed.
-
For each swim lane in the Planning Board, select a planning folder from the
drop-down list. The tracker artifacts contained by the planning folders are
displayed as story cards within the corresponding swim lanes.
- If a selected planning folder has subfolders, the artifacts within the
subfolders are not displayed.
- Cards have a color-coded bar to visually identify the priority. In
addition, the open and closed cards' background is color-coded to
uniquely identify the status.
- For each card, the artifact ID, title, priority, status, assigned to and
points (story points) are displayed. For an artifact, the estimated
effort (in hours) is shown only if its points = 0. Relevant tooltips
appear when you hover your mouse over these data elements.
Assistive information such as the number of cards in the selected planning
folder and planning folder points capacity are displayed at the top of the
swim lane.
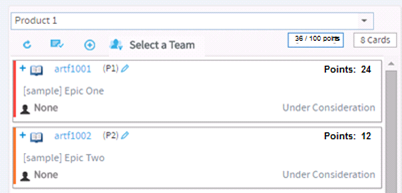
For example, in the following screenshot, the planning folder points capacity
is shown as 36 / 100 Pts. Which means, you planned
for 100 points, whereas the current points capacity (the sum of all open and
closed artifacts) is 36 points. In other words, you have room for taking up
more work in that particular planning folder.
You can also see 2 Cards at the top of the swim lane,
which is the count of the number of cards in the selected planning folder
(by default, only open cards are counted).
Click the Show/hide closed artifacts toggle button to see the count of both
open and closed artifacts.
Show/hide closed artifacts toggle button
Note: You must have set the
Points Capacity while
creating planning folders to be able to see the current points capacity
against the planned points capacity. For more information, see
Create a planning folder.
-
Click the swim lane refresh button to refresh individual swim lanes.
Swimlane refresh button
-
To know more about an artifact, click the artifact ID link.
The View Artifact page is displayed.
-
By default, closed artifacts are not shown in swim lanes. Click the Show/hide
toggle button to show or hide closed artifacts in swim lanes.
Show/hide closed artifacts button
-
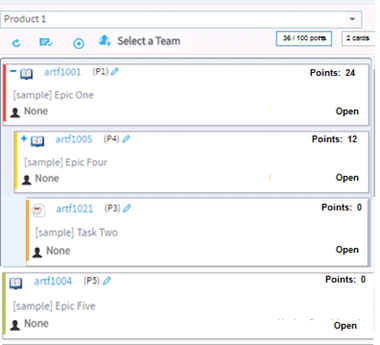
To expand an artifact that has child artifacts, click the
"+" symbol in the artifact card. The first, second
and third-level child artifacts are displayed.
When you expand an artifact, the parent and child artifacts are visually
outlined by means of colored boxes as shown in the following screenshot.

