Configure the TeamCity adapter to notify TeamForge EventQ when builds complete.
Before you start configuration, make sure that you have installed the TeamCity adapter.
The TeamForge EventQ TeamCity adapter has a system configuration as well as build
configuration level settings.
Important: When a build configuration is
copied in TeamCity, the source association key is not carried over. You must add a
corresponding build source in TeamForge Application Server, and enter the source
association key while configuring the new build configuration.
Do this on the TeamCity Server
-
Log on to the TeamCity Server.
-
Click Administration from the top navigation bar and
click Projects from the Project-related
Settings section.
-
If required, click the Create Project drop-down list and
create a project. You can also choose to add build configuration for an existing
project.
-
Select the project for which you wish to add build configuration and click
Create build configuration drop-down list and create
the build configuration.
Do this on the TeamForge Application Server
-
Log on to the TeamForge Application Server.
-
Create a new build source or edit an existing one and associate the build
source with the TeamCity build configuration.
-
Select a project and go to .
-
Click Add New Tool .
-
Select TeamCity from the Select Tool Type
drop-down list.
-
Enter the values for mandatory fields.
-
Select the Include Traceability check box as it
is a mandatory field. A few more fields show up. Enter the build source
details such as the source name, source type,
and
associated commit
source
and click Show Configuration to view the
configuration
details.
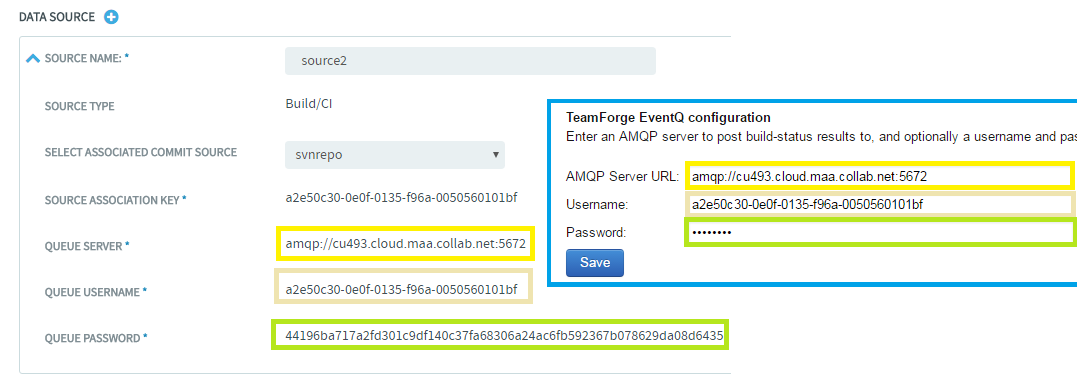
Note: Copy the configuration details such as the source association key,
queue server, queue username, and queue password and keep it handy
for configuring TeamCity as discussed later in
this section.
Do this on the TeamCity Server
-
Click Administration from the top navigation bar.
-
Click TeamForge EventQ from the Server
Administration section.
-
Copy and paste the queue server, queue username and password values which you
noted down earlier during EventQ build source configuration. Make sure that you
include the "ampq" protocol and the port information as shown in the following
illustration.
-
Click Save to save the system configuration.
Note: System configuration steps need to be done only once per TeamCity
server.
-
Click Projects on the
Administration page. Select the build configuration for
the desired project.
-
Select the EventQ tab.
-
Copy and paste the source association key value, which you noted down earlier
during EventQ build source configuration. For more information about source
association keys, see Source association keys.
-
Save the build configuration.
-
Run a build to test the new configuration and verify configuration.