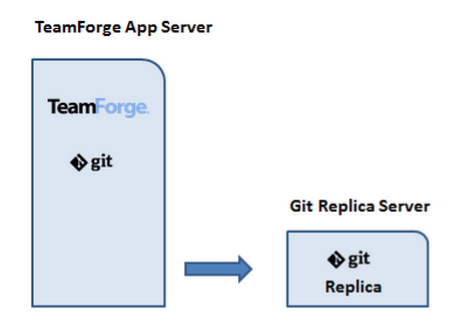
On sites distributed across multiple geographic locations, Git replica servers are
local and remote mirror servers that can provide up to date copies of the central
repositories, which if set up, can address load balancing and fetch performance issues. You
can set up one or more Git replica servers (also referred to as slave or mirror servers)
with TeamForge 8.1 and later.
Points to note before you begin
- Every Git replica server has one and only one 'master' Git server.
- It's not possible to set up both Git master and slave on the same server.
However, you can have multiple master and slave servers in your TeamForge
environment.
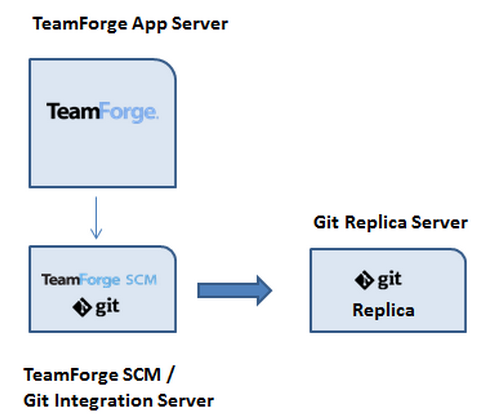
- You may have your master Git integration server installed on the TeamForge
application server's host or on a separate host dedicated to Git/SCM
integration.
- Git replication servers can be set up with TeamForge 8.1 or later only.
- You must upgrade your Git integration server to v8.4.6 or later.
- Have the master Git integration server's externalSystemId
handy.
- Open the /opt/collabnet/gerrit/etc/gerrit.config
file on the master Git integration server and note down the
externalSystemId from the
[teamforge] section.
- Alternatively,
log
on to the TeamForge
Application
Server
as a
Site
Administrator,
click , select the master Git integration server, click
Edit and look for a token such as
exsy####, for example exsy1002, in
the browser URL. This is the external system ID of your Git integration
server.
- Open the TeamForge
Application
Server's
site-options.conf file and keep the values of the
following tokens handy.
-
Install Red Hat Enterprise Linux/CentOS
7.4
and log on to the server as root.
-
Check your basic networking setup. See Set up networking for more
information.
-
Upgrade the operating system packages.
-
Reboot the server.
-
Configure your TeamForge installation repository.
- TeamForge installation repository configuration for sites with internet
access
-
Contact the CollabNet Support and download the TeamForge
17.11
installation repository package to /tmp.
-
Install the repository package.
- yum install -y
/tmp/collabnet-teamforge-repo-17.11.xx-0.noarch.rpm
-
Refresh your repository cache.
- TeamForge installation repository configuration for sites without
internet access
-
Contact the CollabNet Support to get the auxiliary installer package for
TeamForge
17.11
disconnected installation and save it in
/tmp.
- Red Hat Enterprise Linux/CentOS
7.4 64 bit RPM package: CTF-Disconnected-media-17.11.501-841.rhel7.x86_64.rpm
Note: In
addition to the above CentOS
7.4 64 bit RPM package, you must get the following CentOS
7.4 compatibility RPM, which is required for TeamForge
17.11
disconnected media installation on CentOS
7.4 profile:
compat-ctf-dc-media-1.0-1.el7.centos.noarch.rpm.
-
Unpack the disconnected installation package.
-
Unpack the
compat-ctf-dc-media-1.0-1.el7.centos.noarch.rpm
package if you are installing TeamForge
17.11
on CentOS
7.4.
- rpm -ivh
compat-ctf-dc-media-1.0-1.el7.centos.noarch.rpm
-
Note: If the Red Hat Enterprise Linux/CentOS installation DVD is mounted already, skip the following instructions.
If not, mount the DVD.
Mount the Red Hat Enterprise Linux/CentOS installation DVD. The DVD contains the necessary software and
utilities required for installing TeamForge without internet access.
In the following commands, replace "cdrom" with the identifier for
your server's CD/DVD drive, if necessary.
- cd /media/
- mkdir cdrom
- mount /dev/cdrom ./cdrom/
If there are any spaces in the automount, unmount it first and mount
it as a filepath, with no spaces.
-
Create a yum configuration file that points to the Red Hat Enterprise Linux/CentOS installation DVD.
- vi /etc/yum.repos.d/cdrom.repo
Here's a sample yum configuration
file.[RHEL-CDROM]
name=RHEL CDRom
baseurl=file:///media/cdrom/Server/
gpgfile=file:///media/cdrom/RPM-GPG-KEY-redhat-release
enabled=1
gpgcheck=0
-
Verify your yum configuration files.
- yum list httpd
- yum list apr
-
Install the Git packages.
- yum install
teamforge-git
-
Set up the site-options.conf token for Git.
- vi
/opt/collabnet/teamforge/etc/site-options.conf
Note: In this topic:
- my.app.domain.com is an example of the Fully Qualified Domain
Name (FQDN) of your TeamForge
Application
Server.
- my.git.domain.com is an example of the Fully Qualified Domain
Name (FQDN) of your Git
Integration
Server.
- my.gitreplica.domain.com is an example of the Fully Qualified
Domain Name (FQDN) of your Git
Replica
Server.
-
Set
up the
SERVICES
tokens.
my.gitreplica.domain.com:SERVICES=gerrit gerrit-database
my.app.domain.com:SERVICES=ctfcore ctfcore-database ctfcore-datamart etl search subversion cvs binary binary-database
-
Turn on the SSL for your site by editing the relevant variables in the
site-options.conf file. To generate the SSL
certificates, see Generate SSL certificates.
SSL=on
SSL_CERT_FILE=
SSL_KEY_FILE=
SSL_CHAIN_FILE=
Note:
- The
SSL_CHAIN_FILE
is
optional.
- If you use certificates that are generated in-house,
self-signed, or signed by a non-established Certificate
Authority, they must be registered with each client system
that will connect to the TeamForge server.
- For
the setup discussed in this topic, add
the
certificate
of my.app.domain.com to the JVM of
my.git.domain.com
and
my.gitreplica.domain.com.
In
addition, add
the
certificate of
my.gitreplica.domain.com
to the JVM of
my.git.domain.com.
Click here for more
information.
-
Set the gerrit replication server mode.
GERRIT_REPLICATION_MODE=slave
-
Set the external system ID of the master Git integration server. See
'Points to
note before you begin'.
GERRIT_REPLICATION_MASTER_EXTERNAL_SYSTEM_ID=exsy####
-
Set the obfuscation related tokens as discussed earlier in Points to note
before you begin.
-
Save the site-options.conf file.
-
Deploy services.
Now, the gerrit service is running in replica mode. You can now find the newly
created Git
Replica
Server
listed on TeamForge
Application
Server
by accessing the following url.
http://<TF_HOST>/sf/sfmain/do/listSystems
Once you have set up one or more Git
replica
servers,
you can replicate repositories. For more information, see
Replicate repositories with Git replica servers.