Use the context menu available in planning folder List View to quickly choose a
"parent" or "child", remove a "parent", add associations,
add
attachments
or clone
artifacts.
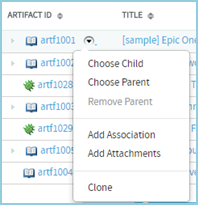
In the planning folder List View, you can see a down arrow icon next to the artifact
ID (as shown in the following screenshot) when you move your mouse over artifact
rows.
Down arrow icon
A context-sensitive menu pops up on clicking the down arrow icon.
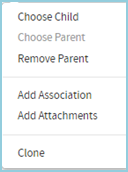
Context menu if an artifact has a parent
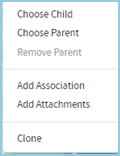
Context menu if an artifact has no parent
To quickly choose a parent or child, add associations and attachments,
or remove a parent:
-
Select a planning folder on the List Trackers,
Planning
Folders
and Teams page.
The planning folder List Artifacts page
appears.
-
Move your mouse over an artifact's ID.
A down arrow icon appears.
-
Click the down arrow icon to see the context menu. Depending on the context,
you can do one of the following tasks.
Choose a child
-
Click Choose Child from the context menu.
The Selecting Children... window
appears.
-
Select the Enter Artifact ID option and type an artifact
ID. This artifact becomes the child.
Tip: You can also select the Add from Recently
Edited option and choose a child from the list of recently
edited artifacts.
-
Click Next.
-
You may add a comment in the
DEPENDENCY
COMMENT
text box.
-
Click Finish.
Note: You may also click Finish and Add Another to
continue adding more children for the same artifact.
Choose a parent
-
Click Choose Parent from the context menu.
The Selecting Parent... window
appears.
-
Select the Enter Artifact ID option and type an artifact
ID. This artifact becomes the parent.
Tip: You can also select the Add from Recently
Edited option and select a parent from the list of recently
edited artifacts.
-
Click Next.
-
You may add a comment in the
DEPENDENCY
COMMENT text box.
-
Click Finish.
Remove a parent
-
Click Remove Parent from the context menu.
A confirmation message appears:
Do you want to remove the dependency?.
-
Click OK.
Add associations
-
Click Add Association from the context menu.
The Add Association Wizard appears.
-
Select the Enter Item ID option and type an artifact ID
for creating an association.
Tip: You can select the Add from Recently
Edited option and select an artifact from the list of
recently edited artifacts.
-
Click Next.
-
You may add a comment in the Association Comment text
box.
-
Click Finish.
Note: You may also click Finish and Add Another to
continue associating more artifacts.
Add attachments
-
Click Add Attachments from the context menu.
The Add Attachments window appears.
-
Type a comment for the attachments in the
COMMENT
TEXT
box.
-
Click Choose File.
-
Browse and select the file you want to attach.
-
Click the Attach another file link to add more
attachments. Repeat this step for adding more attachments.
-
Click Add to attach the selected files to the
artifact.
Clone an artifact
-
Click Clone from the context menu.
The Clone Artifact window appears.
-
Provide a name and description for cloning the artifact.
-
Click Clone to clone the artifact.