Configuring the JIRA Cloud Webhooks

The TeamForge Integration for JIRA® Webhooks configuration instructions.

This integration documentation walks you through the creation of one or more webhooks triggers in JIRA. Each webhook should be scoped to a specific JIRA project issue type. It is therefore required that a separate webhook be set up for each issue type you wish to collect data from for purposes of associations and event reporting.

  1. In TeamForge, navigate to the Project that houses the source code repositories you wish to associate to the JIRA issues in question.
  2. Select Project Home > Project Admin > Tools and click Add Tool.
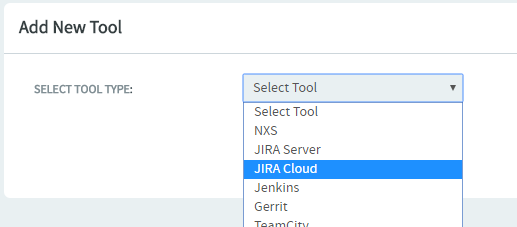
  3. Select JIRA Cloud from the Select Tool Type drop-down list.
  4. Type the Display Name. The Display Name is used to differentiate your JIRA projects/instances associated to this TeamForge project.
  5. Select the Include Traceability check box.
  6. Type the Source Name. This value differentiates the sources you define for this JIRA Project/instance. It is recommended that you name your new source to match the Issue Type in JIRA you’re configuring currently.
  7. Click Generate Webhook

    You will be presented with a unique Webhook URL. This URL should only be used once, as it maps to a specific Project and Issue Type in JIRA.

  8. Copy the entire Webhook URL and retain it for future steps.
  9. Click Save to finish adding your tool (the new JIRA Project/instance).
  10. In JIRA, as a privileged user navigate to System Administration > Webhooks.
  11. Click Create a Webhook and give it a descriptive name and toggle "Status" to Enabled.
  12. Paste the Webhook URL into URL field.
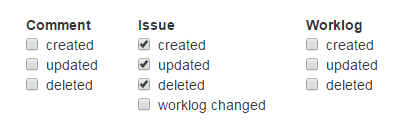
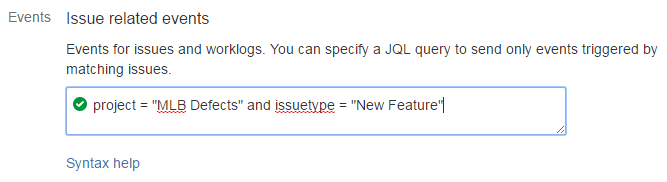
  13. Under the Events section, check the following issue events: created, updated, deleted.
  14. Under the Events section, input JQL to narrow the events triggering webhooks payloads to TeamForge as follows:
    • Supply a Project by entering: project = [select project name]
    • Supply an issue type by entering: and issuetype = [select issue type]
    Tip: Notice that a drop-down menu assists with project and issue type selection once the = symbol has been inputted, followed by an empty space.
    A green check mark indicates you’ve properly configured the webhook.
  15. Click Save. All configuration is now complete for the issue type in question. You should see the newly configured webhook in the listing within the JIRA System Administration > Webhooks screen.
  16. To confirm, create a new issue matching the issue type in question and you should see a new representative activity in the Orchestrate activity stream. Repeat the above steps for each desired issue type. It is recommended that you house all issue types relating to a single JIRA project under the same “Tool” in TeamForge, creating a separate “source” for each issue type.
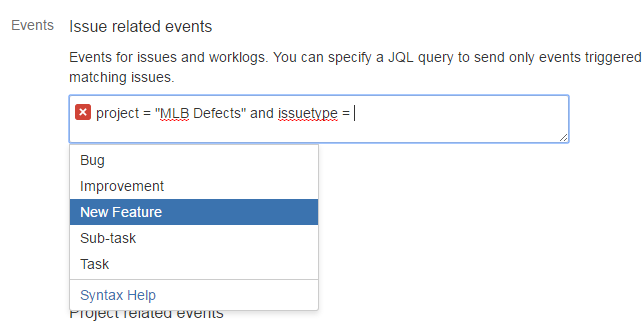
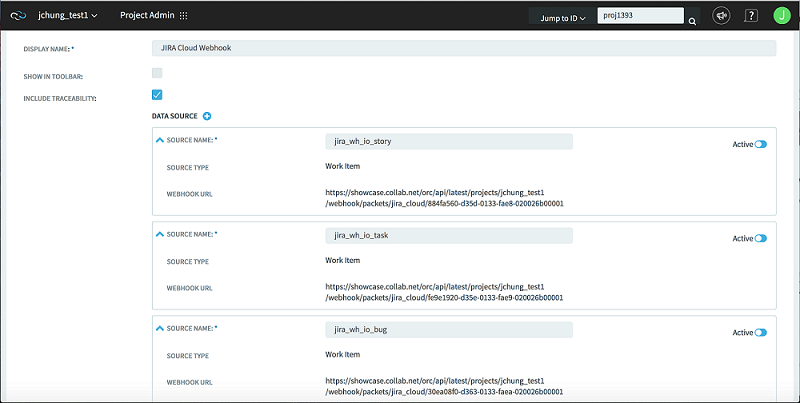
  1. Navigate to the newly created JIRA Cloud Tool in TeamForge: Project Admin > Tools > [Click the tool created in the steps above]
  2. Notice that your existing source is housed here.
  3. Click Data source + to create a second source to house the second JIRA issue type.
  4. Continue with the steps as above.