If you are
already using TeamForge and TestLink as two separate systems, running separately on
two different servers, you can link them together using the TestLink integration installer. This installer links
both the servers enabling TeamForge and TestLink to work as a single integrated
application.
This section
explains the installation of the TestLink
integration installer on the TeamForge and
TestLink servers.
Before you begin the installation process, it is assumed that the
TestLink server has the following set
up:
- java-1.7.0-openjdk-devel.x86_64 (recommended), PHP, MySQL and Apache are
installed on the server where TestLink
is installed.
- Apache contains mod_rewrite and AllowOverride
enabled for the TestLink
Directory.
- TestLink is running on a Linux
(Centos/Redhat/Suse) server where MySQL is also running.
- Make sure that Wget is installed; if it is not installed, do it using the
following command:
yum install wget
Note: Do not proceed without upgrading to TestLink
v1.9.11.
And the TeamForge server has the following
already set up:
- TeamForge is running only with the
PostgreSQL database.
- Appropriate permissions are granted in PostgreSQL to allow the TestLink server to connect to
it.
- Change the listen_addresses in
postgresql.conf residing in the location
/var/lib/pgsql/9.2/data/postgresql.conf as
given below:
The listen_addresses token in
postgresql.conf looks like this:
listen_addresses = '127.0.0.1'.
Append
the IP address of the TeamForge server where
PostgreSQL is running.
For example:
listen_addresses = '127.0.0.1,10.2.17.57',
where '10.2.17.57' is the IP address of the TeamForge server.
- Add an entry like the following in the pg_hba.conf file
residing in the location
/var/lib/pgsql/9.2/data/pg_hba.conf:
host ctfdb ctfuser 10.2.17.67 255.255.255.255 md5
Note: Replace
the value '10.2.17.67' with the IP address where TestLink is
installed.
Important: After every TeamForge recreate, the above-mentioned
postgresql.conf and
pg_hba.conf entries will be removed. These entries
will be required again at the time of reinstall / recreate or upgrade of
TestLink.
- Restart TeamForge.
-
Click https://ctf.open.collab.net/sf/go/projects.ctftestlink/frs and select the appropriate file to
download.
Note: Perform steps 1 to 8 in the TestLink server except
the instruction to obfuscate TeamForge PostgreSQL database
password explained in step 6.
-
Untar the ctf-testlink-glue-installer-2.1.3.tar file to
the /opt/ directory.
- cd /opt/testlink-installer
-
Modify the install.conf file values given in the following
table to suit your installation environment.
| Option |
Description |
|---|
| testlink_dir |
The path of the directory where the TestLink files and libraries are
installed (directory containing index.php) |
| domain=<domain name or host name> |
The TestLink site
information. For example,
mydomain.collab.net/testlink or
testlink.collab.net. You need not give the
protocol information here. |
| protocol |
The protocol used for TestLink installation (http or
https). |
| database_name |
The MySQL database for TestLink. |
| database_user |
The MySQL database user for TestLink. |
| ctf_host |
The host name/IP address where TeamForge is installed. |
| ctf_protocol |
The protocol used for TeamForge (http or https). |
| ctf_db_name |
The database name for TeamForge. |
| ctf_db_username |
The user name for the TeamForge database. |
-
Run the following command:
- yum install python-psycopg2.x86_64
python-suds
-
Run the following commands to provide permission to TestLink users to access the TestLink database:
- mysql -uroot -p testlink
- mysql> grant all on testlink.* to
'testlink'@'localhost';
- mysql> FLUSH PRIVILEGES;
-
Install the TestLink
application.
-
Run the
following
command:
-
The following text will appear prompting you to provide the MySQL
TestLink database password and the TeamForge PostgreSQL database
password:
Important: To obtain the
obfuscated
TeamForge PostgreSQL database password, run the
following command in the TeamForge server:
- /opt/collabnet/teamforge/runtime/scripts/get-runtime-property.sh
DATABASE_PASSWORD
-
Create the runtime.
./install.py -r
-
Create
a namespace for TestLink.
-
Go to the TestLink installer
directory.
- cd
/opt/collabnet/testlink-installer/installer/files
- vi createnamespace.php
-
Change the CTF_BASE_URL to point to the correct
host.
-
Provide the user name and password of any user with site administrator
privileges.
-
Run the following command:
php createnamespace.php
Note: You must run it only once for a TestLink installation.
-
The following text will appear prompting you to provide the TeamForge
administrator user name and password:
- "What administrative user would you like to use to integrate
TestLink to TeamForge": <TeamForge administrator user
name>
- "What is the password for the user you entered": <TeamForge
administrator password>
-
The
newly generated JAR files are found in
/opt/testlink-installer/installer/conf
of the
TestLink server. Copy these files from the TestLink server and upload them to the
TeamForge server. These JAR files
can be uploaded via .
-
The
newly generated configuration files
testlink-application.xml and
testlink-deploy.xml are found in the
/opt/collabnet/testlink-installer/installer/conf
folder. Copy these files from the TestLink server and upload them onto the
TeamForge
server.
These files
enable
the TestLink application to work as
part of TeamForge. For more
information on how to use them, see Configure TestLink for your TeamForge site.
You will notice that the integration setup has been completed and is
running successfully.
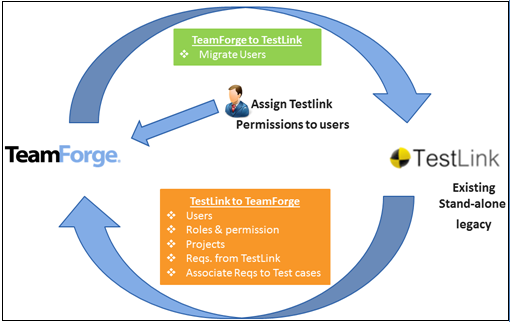
-
Next, you must migrate TeamForge
users to TestLink by running the
following script in the TestLink
server:
- cd /opt/collabnet/testlink-installer
- python migrate_users.py
All TeamForge users are now
available in TestLink.Note: Once the migration is done, every time new users
are added in TeamForge, they are
synchronized automatically with TestLink.
Once
the users are migrated to TestLink, the permission to access TestLink for migrated users has to be
manually created in TeamForge.
-
To access the existing projects in TestLink, you must migrate them to TeamForge.
This
migration includes all the project related data and users being moved from
TestLink to TeamForge.
Important: Users can be migrated from
TestLink to
TeamForge ONLY if the
user name from
TestLink is at least
3 characters in length.
Perform the following steps in the TestLink server:
-
Run the following migration script first:
- cd /opt/testlink-installer
- ./migrate_setup.sh
-
Next run the following:
- sudo ./migrate.py -p <project
X>
For example:
- ./migrate.py -p 2boxsetup
The following illustration shows the migration path.
-
The following text will appear prompting you to enter the TeamForge administrator user name
and password:
- "What administrative user would you like to use to migrate
TestLink Project to TeamForge": <TeamForge administrator user
name>
- "What is the password for the user you entered": <TeamForge
administrator password>
-
Restart TeamForge.