For your source and target systems, map attributes such as project names, and system and repository IDs.
Project mappings are stored in the SYNCHRONIZATION_STATUS table in the central database. To set up your source and target repositories, you add a row to this table for each direction of synchronization. In earlier versions of the connector, it was recommended that you use a graphical database editing tool or manually append the appropriate INSERT statements to the CCFDB.script file in the <CCF_HOME>\production\centralCCFDatabase folder. You can now set this up using the CCF user interface.
- In the CCF Explorer, right-click Project Mappings for your landscape and select .
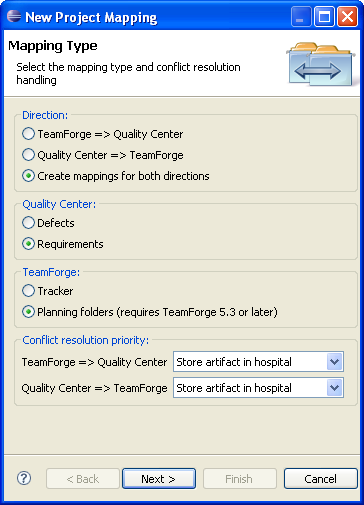
- In the New Project Mapping window, select the mapping direction. For the bidirectional scenario example, select Create mappings for both directions.
- Select the components you want to map in Quality Center and TeamForge.
The possible mappings are:
- Quality Center defects to TeamForge Tracker artifacts
- Quality Center requirements to TeamForge Tracker artifacts
- Quality Center requirements to TeamForge planning folder artifacts
Note: You need TeamForge 5.3 or later for the planning folder feature.
- Specify how potential conflicts should be resolved. You can choose to:
- Replace the target artifact's values with the source artifact's changes
- Discard the changes in the source artifact and not update the target artifact
- Quarantine the conflicting artifact in the hospital
- Click Next.

- Specify the Quality Center domain and project names.
- If you chose to map Quality Center requirements, browse to or enter a Requirement type.
- Specify a TeamForge component ID.
- If you chose to map Quality Center requirements to a TeamForge planning folder, browse to a TeamForge project or enter its ID.
- If you chose to map Quality Center requirements to a TeamForge tracker, browse to the tracker or enter its ID.
If your integration involves Project Tracker, you will need to specify the CollabNet Enterprise Edition project name and Project Tracker artifact type.
- Click Finish.