During a sprint, TeamForge project members can create tasks for new stories, assign and highlight tasks, update effort, and drag and drop tasks across swimlanes as they progress.
-
Right-click a project and select .
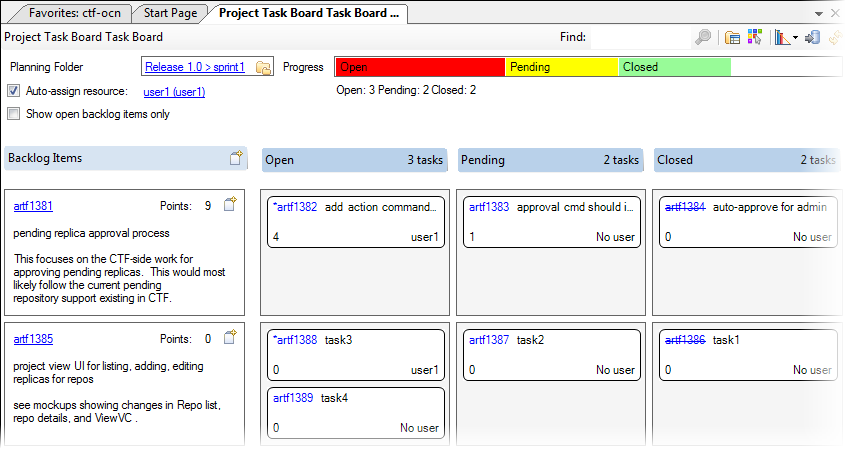
Here's an example of the task board interface:

The top area lets you control what you see in the task board.
- When you open the task board, the planning folder is set to the one you last worked with. Typically, this is the current sprint. To change the planning folder, click its icon and select the one you want from the dropdown list. The task board will change to reflect your selection.
-
Select Show open backlog items
only if you want to see only open stories.
Once all tasks for a story have been completed and the story is done, you may want it to drop off the task board. -
Assign a resource to a task.
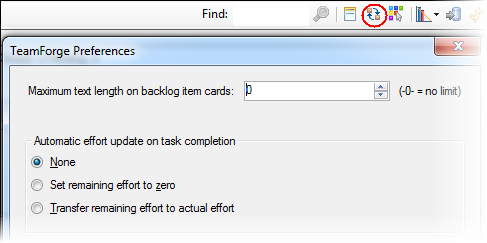
Using the option from the Desktop's main menu baror the Taskboard preferences option in the task board toolbar, you can configure how an unassigned task is assigned when it is moved between swimlanes. The default option is to have a resource automatically assigned. This (default) option displays the Auto-assign resource checkbox on the task board. Rather than assign a task to the user moving the task, this option allows you to select the user when the task's status changes. This could be particularly useful if you were using the task board during a daily stand-up and have a scrum master changing the resource as team members give their status.
However, it is common for team members to want to assign a task to themselves when its status changes. If this is the case, you may want to select Assign to myself as your task board preference.
-
The task board allows you to select a color to highlight the tasks assigned to
each team member. As a team member, you would typically highlight the tasks
assigned to you with a specific color.

- Monitor your project's progress — along with a snapshot view of the completion of the tasks in the sprint, you also have quick access to the TeamForge charts (in the upper right corner of the task board) for the selected planning folder.
The left column in the task board displays all your backlog items such as epics and user stories. These story cards show limited but specific information: artifact ID, title, description, and configured story size.
- Story cards are presented in ranked sequence. To change their rank, drag and drop them as appropriate.
-
To update a story card using the CollabNet Desktop artifact editor, use
either of these options:
- Click the Artifact ID.
- Right-click the story card and select .
-
In addition to the artifact editor, you have a specialized, limited story
editor for the task board cards. The story editor focuses on the core fields for
a story so that they can be edited quickly and easily. To update a card using
the story editor, use one of these options:
- Double-click the story card.
- Right-click the story card and select .
Tip: If you just want to copy and paste artifact details such as the ID, URL and Summary, you don't need to open up the editor. Instead, right-click the card and select the Copy Details option. Copied details are placed in the clipboard. This option is available only for artifacts that have been submitted. -
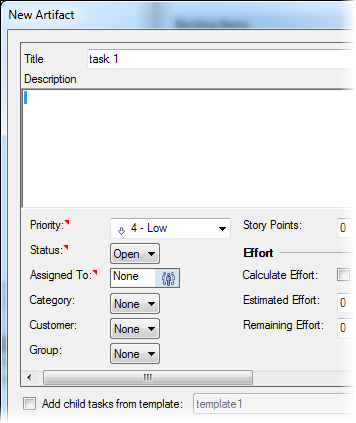
To create a new backlog item (story card),
click the Create backlog item icon:
In the New Artifact dialog, specify the attributes for the story.
 Tip: If a task template has been set up, select Add child tasks from template to create several tasks at once.
The bulk of the task board displays task cards. Tasks are displayed in swimlanes that represent their status. As with the story card, the task card contains information focused on the Agile process: title, description, user assigned to the task, and configured effort field.
-
To indicate the progress you are making on a task, drag and drop the task
between the swimlanes.
Tip: If you drag and drop a task to the "done" swimlane, you can have the remaining effort automatically set to 0. You can set this using the option from the Desktop's main menu bar or the Taskboard preferences option in the task board toolbar.

- To limit the text length on backlog item cards, enter a value for Maximum text length on backlog item cards in your Taskboard preferences. A value of "0", the default, indicates that there is no limit set.
-
To update a task using the CollabNet
Desktop artifact editor, use
either of these options:
- Click the Artifact ID.
- Right-click the task card and select .
-
To open the specialized task editor, you have these options:
- Double-click the task card.
- Right-click the task card and select .
-
To create a new task for a story, use either of these options:
- Click the New Artifact icon within the story card.
- Right-click the story card and select New Task.
- To change the user assigned to the task, or the effort for the task, click the corresponding field and make your changes.
-
Select the option to poll the server and specify how often this is to be done.
Also indicate whether you want to have the task board refresh
automatically.

