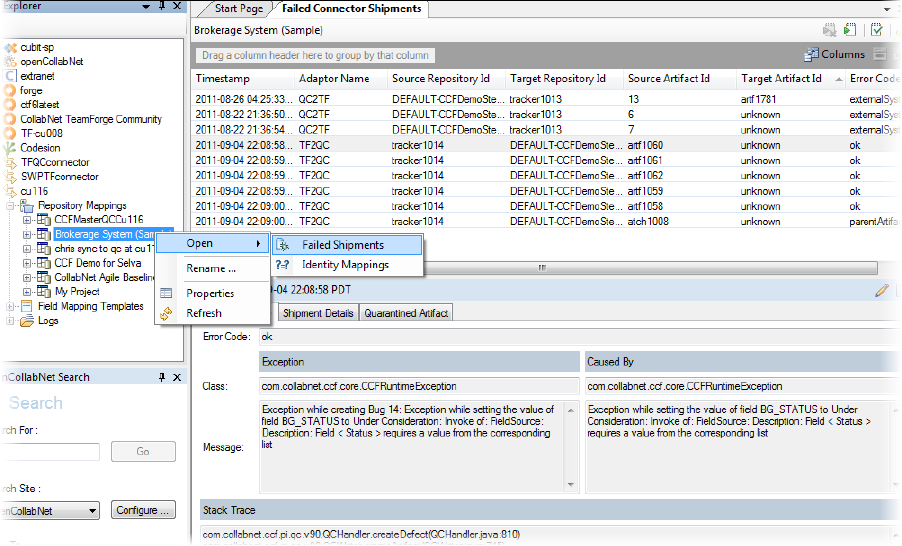
When an artifact fails to ship, it is stored in the Failed Connector Shipments table. You can examine it, correct the problem, and replay it. Or you can fix the problem and re-run the connector. When the artifact ships successfully, you can mark older versions as fixed.
-
In the Site Explorer>, right-click a
repository mapping or specific mapping direction and select .
Here's an example:

- To add or remove columns in the Failed Shipments table, click the Columns icon (in the top right corner of the upper pane) and select the fields you want displayed.
- Select a table row to view the artifact's XML representation, details of the connector participants and artifacts involved in the shipment, and the exception that caused the failure.
-
Let's say an artifact failed to ship. Here's what you can do:
-
Select the artifact and click the Edit icon to examine it and fix it in the XML editor that opens up.

-
Replay it.

-
Select the artifact and click the Edit icon to examine it and fix it in the XML editor that opens up.
-
Let's say an artifact failed to ship due to an incorrect mapping. You subsequently updated the mapping and re-ran the connector so that synchronization succeeded and the artifact was shipped. However, the Failed Shipments entry for the artifact could still exist. To denote that this is now fixed, select the artifact in the table and click the Mark as Fixed icon.

- To keep the failed shipments table from getting too big, you may want to periodically delete older entries and artifacts that get reprocessed and successfully replayed.