A CloudForge project is a container where you add services for source control and project management, and project members who access these services based on their permissions.
To and users and additional services to your project, double-click the project and
use the web interface.
- In the Site Explorer, right-click a CloudForge site and select Add Project. The New Project dialog appears.
- Enter the System Name. The System Name must be unique within the account. It is used within access URLs.
- Enter the Project Name. This is the project's title and is displayed in the Site Explorer.
-
Select services for your project.
Your choices are TeamForge,
Subversion and Git. Adding services at this stage is optional. You can add them
at any point after your project is created.
- When you select Git, a Git repository is added to the project; access URLs take the form domainname.git.cloudforge.com/systemname.
- When you select Subversion, a Subversion repository is added to the project. Subversion access URLs take the form domainname.svn.cloudforge.com/systemname.
- When you select TeamForge, its various ALM and Agile tools become available in the project.
- Click OK.
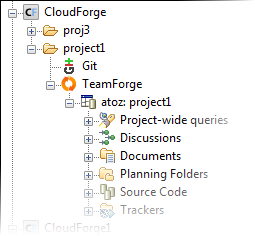
When you've added a CloudForge project
with TeamForge, you can expand the TeamForge node to see the child nodes you would
have in a regular TeamForge project.
- To add (more) services to a CloudForge project, right-click the project node, select Add CloudForge Services and select the ones you want.
- The Setup TeamForge Connection option is enabled for a TeamForge service node if a corresponding TeamForge site has not already been created. You can use this option to create a new (top-level) TeamForge site.
- For the access URL and other details, right-click the item in the Site Explorer and select Properties.